Raspberry Pi + TagoIO: Send and Receive Data with Python SDK and MQTT
Raspberry Pi is a popular embedded platform with built-in connectivity (Bluetooth, Wi‑Fi, Ethernet), solid compute, and support for Linux distros (Raspberry Pi OS, Ubuntu, and others). It works well for IoT prototypes and products where you want a small, inexpensive device that can run full Linux.
This tutorial walks you through the first steps of building IoT projects using Raspberry Pi and the TagoIO platform. You’ll send data to TagoIO and retrieve it using two approaches:
- TagoIO Python SDK
- MQTT with the Paho MQTT client
We’ll also set up an Action in TagoIO to publish data to a custom MQTT topic.
What You’ll Need
- Raspberry Pi 3B or newer (Zero W / 3B+ / 4)
- microSD card (minimum 4 GB; recommended 16 GB class 10)
- Raspberry Pi OS installed (get the latest from raspberrypi.org/downloads)
- Internet connectivity (Wi‑Fi or Ethernet)
- Python 3.6 or newer
You should be comfortable with basic Python.
Set Up TagoIO and Create a Device
Create your TagoIO account and a device: see Getting Started.
After you create a device, TagoIO generates a device token. You’ll use this token in the examples below.
How Raspberry Pi Interacts with TagoIO
There are two main ways to interact with TagoIO from a Raspberry Pi:
- TagoIO Python SDK
- A general‑purpose MQTT client (Paho MQTT)
We’ll cover both.
Approach 1: TagoIO Python SDK
Update Raspberry Pi OS
Run these commands in a terminal. This can take up to an hour and will reboot the device.
sudo apt update
sudo apt dist-upgrade
sudo apt clean
sudo reboot
Install the SDK
sudo pip3 install -U tago
Send Your First Data Point (Python SDK)
We’ll send a temperature reading. Save this as send_first_data.py and replace DEVICE_TOKEN_HERE with your device token.
import tago

my_device = tago.Device('DEVICE_TOKEN_HERE')

# Data to send:
# - variable (required)
# - unit (optional)
# - value (required)
# - time (optional, YYYY-MM-DD HH:MM:SS)
# - location (optional, lat/lng)
data = {
    'variable': 'temperature',
    'unit': 'F',
    'value': 55,
    'time': '2020-04-22 13:00:00',
    'location': {'lat': 42.2974279, 'lng': -85.628292},
}

result = my_device.insert(data)
print(result)
Run it:
python3 send_first_data.py
Expected output:
1 Data Added
This means your data was written to the device bucket in TagoIO.
Retrieve Data (Python SDK)
Save as retrieve_data.py and replace DEVICE_TOKEN_HERE.
import tago

my_device = tago.Device('DEVICE_TOKEN_HERE')

# Retrieve the most recent value of the 'temperature' variable
data_filter = {
    'variable': 'temperature',
    'query': 'last_value',
}

result = my_device.find(data_filter)
print(result)
Run it:
python3 retrieve_data.py
Example output:
[{
  'id': '64f1c2a8bb3d420012345678',
  'variable': 'temperature',
  'unit': 'F',
  'value': 55,
  'time': '2020-04-22 13:00:00',
  'location': {'lat': 42.2974279, 'lng': -85.628292},
  'created_at': '2025-09-01T14:22:10.123Z',
}]
You can also filter by time range by adding start_date and end_date:
data_filter = {
    'variable': 'temperature',
    'query': 'last_value',
    'start_date': '2020-04-23 00:00:00',
    'end_date': '2020-04-23 23:59:59',
}
For more query options, see Getting Data.
Approach 2: Use MQTT (Paho) to Send and Receive Data
This approach is useful if you can’t or don’t want to use the SDK. MQTT is lightweight and works well on constrained devices.
Install Paho MQTT
sudo pip3 install paho-mqtt
Send Data via MQTT
This script publishes a random temperature to TagoIO using MQTT. Save as send_data_mqtt.py and replace DEVICE_TOKEN_HERE.
import paho.mqtt.client as mqtt
import random
import json

# Your device token
device_token = 'DEVICE_TOKEN_HERE'

broker = 'mqtt.tago.io'
broker_port = 1883
mqtt_keep_alive = 60

# Publish to this topic to send data to TagoIO
mqtt_publish_topic = 'tago/data/post'

# Username is ignored by TagoIO; password must be the device token
mqtt_username = 'mqtt_client'
mqtt_password = device_token

def on_connect(client, userdata, flags, rc):
    print('[STATUS] Connected to MQTT broker. Result:', rc)

print('[STATUS] Initializing MQTT...')
client = mqtt.Client()
client.username_pw_set(mqtt_username, mqtt_password)
client.on_connect = on_connect
client.connect(broker, broker_port, mqtt_keep_alive)

# Generate a random temperature and format as JSON
temperature = random.randint(32, 86)
print(f'Random temperature generated: {temperature}F')

payload = {'variable': 'temperature', 'unit': 'F', 'value': temperature}
payload_str = json.dumps(payload)

# Publish
client.publish(mqtt_publish_topic, payload_str)
print('Data sent to TagoIO platform')
client.disconnect()
If you create a simple TagoIO dashboard widget for the temperature variable, you’ll see the value as it arrives.

Figure 3 — Temperature value published to TagoIO via MQTT
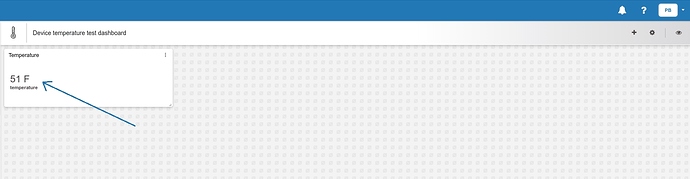
Figure 4 — Temperature value displayed on a TagoIO dashboard
Receive Data via MQTT Using a TagoIO Action
MQTT clients can’t query historical data from TagoIO directly. To receive data over MQTT, configure an Action that publishes new incoming data to a custom MQTT topic. Your MQTT client will subscribe to that topic and receive messages as new data arrives.
Create an Action to Publish Incoming Data to MQTT
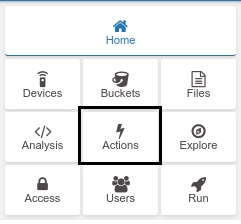
-
Click Actions.
Figure 5 — Actions button -
Click Add Action.

Figure 6 — Add Action button -
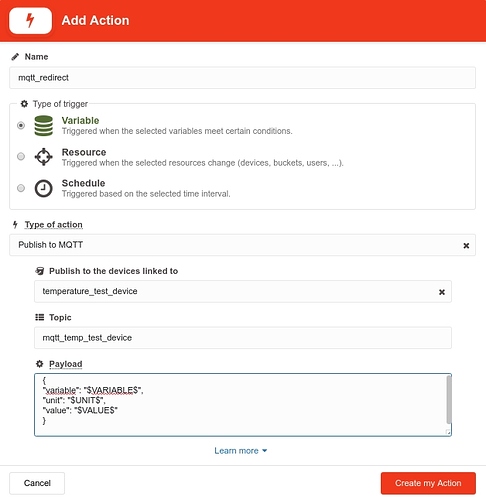
Fill out the Add Action form and click Create My Action:
-
Name: any name (e.g., mqtt_redirect)
-
Type of trigger: Variable
-
Type of Action: Publish to MQTT
-
Publish to the devices linked to: select your device (e.g., temperature_test_device)
-
Topic: your custom topic (e.g., mqtt_temp_test_device)
-
Payload (JSON template):
{
  "variable": "$VARIABLE$",
  "unit": "$UNIT$",
  "value": "$VALUE$"
}
Figure 7 — Add Action form filled -
-
On the next screen, configure:
- Select the device: your device
- Trigger variable: temperature
- Trigger condition: Anything
Then click Save.
Figure 8 — Action trigger configuration

Your Action is ready. TagoIO will publish new temperature values to your custom MQTT topic.
MQTT Subscriber to Receive Published Data
Save as receive_data_mqtt.py. Replace placeholders to match your Action and device token.
import paho.mqtt.client as mqtt

# Your device token
device_token = 'DEVICE_TOKEN_HERE'

broker = 'mqtt.tago.io'
broker_port = 1883
mqtt_keep_alive = 60

# Subscribe to the topic you configured in the Action (e.g., mqtt_temp_test_device)
mqtt_subscribe_topic = 'mqtt_temp_test_device'

# Username is ignored by TagoIO; password must be the device token
mqtt_username = 'mqtt_client'
mqtt_password = device_token

def on_connect(client, userdata, flags, rc):
    print('[STATUS] Connected to MQTT broker. Result:', rc)
    client.subscribe(mqtt_subscribe_topic)
    print(f'[STATUS] Subscribed to topic: {mqtt_subscribe_topic}')

def on_message(client, userdata, message):
    print(f"Received message '{message.payload.decode()}' on topic '{message.topic}' with QoS {message.qos}")

print('[STATUS] Initializing MQTT...')
client = mqtt.Client()
client.username_pw_set(mqtt_username, mqtt_password)
client.on_connect = on_connect
client.on_message = on_message

client.connect(broker, broker_port, mqtt_keep_alive)

try:
    client.loop_forever()
except KeyboardInterrupt:
    pass
finally:
    client.disconnect()
Test with two terminals:
- Terminal A: run the publisher (send_data_mqtt.py) to send temperature
- Terminal B: run the subscriber (receive_data_mqtt.py) to receive the Action-forwarded message

Figure 9 — Sending (left) and receiving (right) data via MQTT
What You Learned
- How to send and retrieve data from TagoIO using the Python SDK
- How to publish data to TagoIO via MQTT
- How to configure a TagoIO Action that publishes incoming data to a custom MQTT topic
- How to subscribe to that topic to receive new data in real time
Use the SDK when you have full Python available and want a straightforward API. Use MQTT for lightweight clients or when you prefer a protocol-first approach. Both work well on Raspberry Pi and similar Linux boards.