This tutorial provides a step-by-step guide to integrate Myriota Satellite with the TagoIO Platform. By following these instructions, you will enable data transmission from your Myriota-enabled IoT devices to TagoIO, allowing you to visualize and manage your satellite data efficiently.
Prerequisites
Before you begin, ensure you have the following:
- Myriota account: Active access to the Myriota Console Manager
- Myriota-enabled device: A device with Myriota module properly configured
- TagoIO account: An active TagoIO account with device creation permissions
Step 1: Create Authorization in TagoIO
-
Access Authorizations:
- Go to Devices.
- Click on Authorizations at the top of the page.
-
Create a New Authorization:
- Click the Create Authorization button.
- Provide a meaningful name for the authorization (e.g., Myriota-Integration).
- Click Save.
-
Copy the Authorization Token:
- After creation, copy the authorization token. You will need this in later steps.
Note: You only need to create one Authorization for all your Myriota devices.
Step 2: Setup Integration in Myriota
Go to the Myriota Console Manager website and create a new Destination. You can access it under the menu Destination > Add new destination.
Configure the Integration:
| Field | Description |
| Type | Select HTTP |
| Uplink data URL | Use the endpoint format https://myriota.middleware.REGION.tago.io. Replace REGION with your deployment region (e.g., us-e1, eu-w1). For a list of available regions, visit TagoIO Network Integration. |
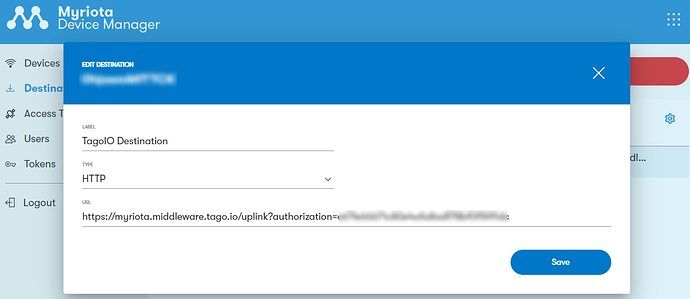
The endpoint https://myriota.middleware.tago.io points to the USA region. As we are committed to continuing support for this endpoint, we recommend that users in the USA region update their webhooks to https://myriota.middleware.us-e1.tago.io.
Step 3: Add Device in TagoIO
To integrate your Myriota device with the TagoIO Platform, follow these guidelines:
-
Add a New Device:
- Go to Devices.
- Select Myriota as the network type.
- Choose the appropriate device connector from the available options.
- Enter your device ID/serial number exactly as it appears in the Myriota console.
- Complete the device creation process by providing a name and any additional required information.
-
Verify Device Configuration:
- Ensure the device ID/serial number matches exactly between Myriota and TagoIO.
- Confirm the device creation process by providing a name and ani additional required information.
For detailed instructions on adding devices, visit the Adding Devices page.
Finalizing Setup
- Power On Your Devices:
- Turn on your Myriota device to initiate data transmission.
- Ensure the device is in range of satellite coverage.
- Verify Data Reception:
- In TagoIO, navigate to the Device and into the Data tab to confirm that data is being received.
- Alternatively, use the Live Inspector within your device settings to monitor incoming data in real-time.
With data successfully flowing into TagoIO, you can start creating Dashboards, Analyses, and Actions to visualize and manage your satellite device data effectively.